Saturday 20 June 2009

It is all over

It has been a weird end but it is over. It is a shame Anja’s film had to be rushed so much at the last minute but I guess experiencing productions like this and learning from it is what this is all about.

I had a good time working in Daryl’s group, it was quite an enjoyable experience being co-director of his film, and producer (for some of the last term at least). I was surprised at how good at producing Daryl’s film I was. Production schedules helped us a lot and I believe the film wouldn’t have been as good without them.

Admittedly I didn’t do a schedule for the last week or so as it was just too busy. Finding potential and ACTUAL problems wit members not working, or work not completed on time was all due to production scheduling so I’m glad I decided to fulfil this role when I did.

It is a shame I wasn’t given more work on Anja’s film though, especially more compositing and overall post production work as I this is what I have the most passion and enjoyment for.

I let her know halfway through that a lot of my time would be taken on Daryl’s film as it needed a lot more help with direction and general hard labour, especially considering as all his members were mainly working for other groups. I just hoped this didn’t put Anja off giving me work as, if asked more, I would have done a lot more work for her.

Oh well, it has been an experience and I have learnt a lot, and we got our films finished! Hoorah! I wish everyone the best from here on out. It has been a pleasure.

Friday 19 June 2009

Yesterday, Anja rang me up at the end of the day to tell me that she wasnted the composition of the hospital Shot redone. Apparently, she wanted the girl to be running slower and from teh distance, teh crane should be smaller and have two of them, and also the abckground changing so that it is close up to begin with, then further away after the fade to white.

She also wanted the character at the window to be standing on the left side. I think this would kind of confuse things with teh character running on from the left also, you wouldn't be able to notice it as much.

Here is a video showing each layer that is used in the creation of the composition.

Wednesday 17 June 2009

Anja rang me up today and asked me to composite the hospital window shot for her. It is a little bit unprofessional to ask me to start compositing now as it is getting so late but it isn't too bad, especially now that Daryl's film is practically complete.

She told me where the files were on the Public drive and i asked her whether all the files I need for the composite were already in the aftereffects file she set up for me. She assured me they were (apart from some animation that is still being worked on) and gave me a rough description accross the phone as to how to composite the scene.

I've said it before, but it is really hard to understand what someone wants from you when they aren' there to explain it to you. Or don't show you anything to help you understand exactly what they want.

Unfortunately all the files were not in the file. The AfterFX file only had the window and main character in it. Luckily Dan was around and found the rest of the files for me. Unfortunately not all the files I needed to complete the enitre composite were ready and she was still creating the crane animation. Apparently she tasked Tasha to finish the run sequenc
e too. It was a pain though as after completing as much as I could I then had to wait around for the rest of the files. It meant that because I had to wait for all the files it made it more difficult for me to get on with things. I had finished what I could without the run and crane by lunch and by 3-4 pm i received the crane sequence. this meant I could start knocking up a bit of lighting together with teh sun better and more in time with the crane animation. By 6pm I was tired of waiting for the files and went home. Just a I was leaving Dan leT me know that Anja had sent me the run sequence. I finished the rest at home and sent it to Anja that night.

This is what I ended up with.


Unfortunately, it took me a while to figure out why AfterFX wasn't working with teh scene very well. I noticed it was because Anja's pixel dimensions that she used for her animations were ridiculously high. They were set to 400 dpi also. I reduced it to 72 dpi and it made After FX a lot more user friendly.


This picture shows the shot ungraded.


This other shot is the graded version.


Tuesday 16 June 2009

Tuesday 16th June

Today we went through btiw that needed to be completed in order to finalise the film. Daryl was putting together all the scenes he has redone tweaks to, for example the animation to the trophy at the beginning, a few RAM shots where his eyes texture was a little corrupted. We also lost a few files to the chair animation. I went in to Maya and have redone the chair animation again, this time with toon lines, which the previous version didn’t have. The old version was also the old version of the chair, so it was probably better that we couldn’t find the files.

Here is the animation..

Daryl helped me with this to ensure my timings went exactly in time with his 2D animation.

Today I also started creating the new intro sequence. I’ve said this before, but I left this to the last minute as we already had an intro complete by Sam Harvey. As we have just under a week left to finish off the film it gives me plenty of time to to it. In fact I finished it tonight.

During the day I re created the television model in Maya (i modelled it a week or so ago but completely lost the file). Luckily it looks identical to my previous model as I am using the same reference. I textured it and gave it blinn textures for subtle light shining. I then started texturing the wallpaper for the background. I went online looking for some nice old wallpaper textures and found this..

I played around with it in Photoshop to make it look better and suit our animation more.. I envisaged a nice green wallpaper with the similar pattern as this texture.

This is what i ended up with..

It is very similar but is of course the green colour I chose and also a hint of orange for the tiled pattern to fit in nicely with it. If I have more time again I may go over the pattern and make it look even more unique and possibly a brighter tine of orange/gold.

Daryl had also created a newer intro sequence with Sam’s logo. I liked it, but unfortunately It had low quality images blended into it again, I recreated it so the images on the background blended nicely with the white.

I then started compositing the intro together this evening. I put the wallpaper and television layers in After Effects first and put the original clips for our intro behind the television layer so it looked liked it was on the screen. I made sure my 3D model had a completely hollow screen so it would make this part of the compositing easier.

After putting all of the footage in, and tweaking the title sequence so that the logo masks out to show the main set, I started doing effects to make it look like a television screen.

I already learnt how to do television grain from the effects I’ve done previously. The same with the television lines so this didn’t take too long. I tinted the entire image black and white and animated it so that it became progressively full colour and scaled the entire composition in whilst it did this. I also gave it a high contrast as a television set of this nature would most likely give. I also experimented with a thick white scan line that goes down the screen a couple of times, again to show off this being an old television.

Lastly, to finish this scene off i scaled the background wallpaper at a different speed than the television to give the illusion that the television is in front of the wallpaper and blurred the wallpaper the more it zoomed in, so to focus the attention more to the television screen.

And finally I added lights to the scene, mainly the background wallpaper, but also some subtle light fluctuation coming from the television screen itself as it it were really projecting light. I then tinted the entire composition to make it look slightly dull. This not only made it slightly more realistic but also gave a nice tone difference compared to the film which is a light brighter and a lot more fun.

Here it is...

Here is a video showing short clips of some of the different types of layers used in the making of the shot...

Today I was finishing off final renders and collaborating them all together in premiere as a final edit. We finished it all by the end of the day and rendered out a rough .wmv but came up with an error at the end, probably due to memory issues of the PCs. It still plays, but has quite a few graphical glitches every now and again. We will render out a proper version later on.

I also spoke to Anja today. She made it clear that she needs me to work for her in the coming days as it is getting so close to deadline. She also clearly expressed and warned me that if I didn’t create work good enough for her standard then I will not be in the final credits for her film.

I thought this was completely unfair for her to decide this, considering I have worked for her all this time even alongside Daryl’s film. I thought this was really unprofessional although Anja didn’t think so. She told me that she doesn’t think I should go into the credits if none of my work will be shown in the final film.

Even though she acted in such an unprofessional and aggressive way I still agreed to work for her. I want her film to succeed regardless of emotions or stress. I just wished Anja was more organised and had given me more work earlier on. I imagine she will be expecting my help after the hand in, to finish off the film for the degree show and I will surely help her. It is just a shame because now most of this work will not get marked as it will be done after hand in.

Hopefully the film will shine at the degree show though.

After our discussion Anja went on to fix up the crane scene I was previously working on. She was making new render layers because I had not updated the old ones from the original file. The newest file has a lot more cranes in as Anja wanted, and I hadn't changed the render layers to compensate. She had previously created newer ones for all the new and old cranes but decided now that she didn’t like them. I asked her if there was more important work she needed to get finished by Friday. If there was then it would make sense to do that rather than fix up a scene that already has a finished version.

She told me she needs to finish off the 2D animation for the scene she was fixing up. This didn’t make any sense to me to leave the animation… one of the most important parts of the scene and told her this but she seemed adamant to continue anyway. I offered to complete what she was working at home tonight as it didn’t take me too long to do before and it makes more sense for her to work on her animation which I think is a lot more important.

She agreed and so I have to finish creating these render layers at home tonight.

Sunday 14 June 2009

Busy busy weekend

It has been a busy weekend. I have finished off a lot more renders of Daryl’s film and have put them all together in a final edit. There were a few files missing but Daryl's sent most of these straight away. Unfortunately there were few scenes that were either at college of have somehow been lost along the process. We have saved so many Public and Local folders we may have lost few files in the process.

This isn’t too bad as it is only a couple of scenes. I’m sure the files are lying around somewhere.

I was meant to be doing Anja’s work today although she didn’t send me over any files so I continued work for Daryl' instead.

This time meant I could do some nice effects on Daryl’s film.

One of the first changes I did was a test effect for the audience being lit up when RAM is using the randomizer on his screen to randomly select an audience member. On daryl's test the entire screen just kept flashing. This wasn't obvious at all what was meant to be going on and would probably be bad for photo-sensitive epileptics.

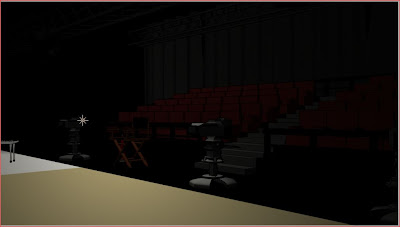
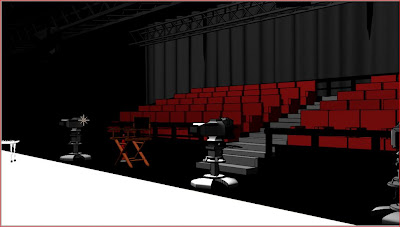
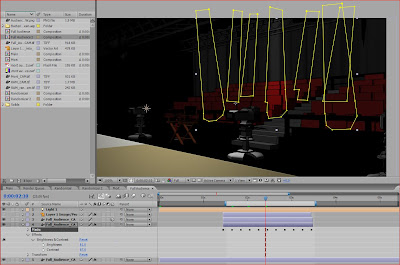
I did a simple test by lighting up random seats of the audience. I did this by creating a light in after effects and lighting the scene to incredible amounts so the seats of the audience were completely lit up. I then masked out areas to the shapes of spotlights and keyed the opacity of each mask so that the layers would only be on one at a time. of course behind all this I had the original background which is dark so all together it appears that spot lights are appearing all over the audience. There is a spotlight feature in afterFX but it wouldn't look as good as masks are needed to go around teh chairs in front of the area it is lighting up, to give ther illusion tha the lights arwe lighting up behind the chairs infront of its position.

The following pictures show the two images and how I masked them, along with the video showing it in action.

Alongside this scene is of course the randomizer on RAM itself. I was unhappy with Daryl's version from before. It served it's purpose I geuss but it just didn't look professional. I thought a lot more work was needed on the graphical element that would be passing through RAMS face. This is an example of Daryl's work from before.

I asked him to create almost a film strip of images which he has done and looks fine, but the pictures on each cell is pretty bad quality. There is also nothing behind the images, it just looks like images were shoved onto teh strip and I don't think this looks good enough.

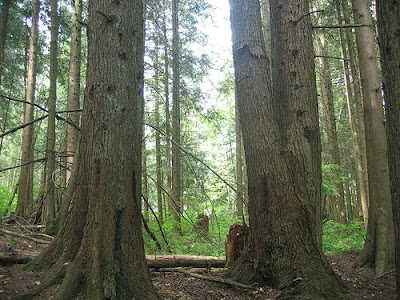
I decided to go over and create higher quality dimenions of teh concept designs and mask them out and bring them back onto the strips. This time though, I repositioned them on the squares so they are no longer stretched or pixelated, but are nicely placed within the cell as if someone had taken a photo of them. I also made it longer so that the strip can properly loop n the animation now, before when the clip got near the end of the strip it would suddenly jump to a random part of the strip and continue liek that. Now the strip can animate down towards morts face and cut back to the first cells of the strip seamlessly without notice. I also decided to use a forest/swamp background behind them as that is really where the film's studio is meant ot be set.

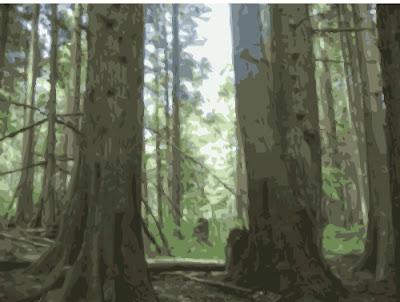
For this i used a photo from the internet of a forest and livetraced it in illustrator to give it a cartoony look. I also used this same exact picture for a painting on the set previously.

Here is the original photo along with the live traced version.

After finishing this I then put it into the scene with RAMS face and completely redid the animation on his screen. I created a longer strip so it made Daryl's previous animated keyframes redundant. I kept his original idea of looping the strip. Here is the clip.

I have also done a nice camera zoom and fuzz for the banana shot to signify how the cameraman is quickly reacting. This would make sense in terms of filmic language and making sure the audience understands what is going on, but now also fits in with the theme of the film.

Another shot I did some effects for was when RAM carries Susie over from the side of the screen. After Susie jumps off from RAMS back she doesn’t really do much and it stands out. RAM also has some really nice animation and would be good for the audience to see. Instead of simply zooming in to RAM more I decided to use a similar technique that I used on the banana shot to make it look like the cameraman is reacting to what is going on in the set, just as if it were live and going wrong.

This is why I added the lens changing focus, the film grain going a little out of control and even loss of colour slightly. This all used to make it look like the cameraman is panicking behind the camera. Personally I think it works well, in both this respect and the fact it still keeps RAM central to the action until Susie is needed.

Lastly I also created the video being displayed on RAM’s screen of the teeth, gums and bacteria. Daryl previously got a photo of horrible looking teeth and roughly animated Bacteria on it. The photo was great and even gave a reaction to people who were looking over our shoulders whilst working, although the quality of the photo was horrible.

I went online and found a nice good quality photo of teeth and manipulated it so it was unrecognizable to the original photo. I also discoloured the teeth to make them look more gross. The original photo the teeth looked perfect. With more time i would like to come back to this and mix several photos of teeth to make it look really horrible and disgusting, but keeping to the quality.

Here is the first version of the animation I created. I also animated the bacteria a lot more and made a big piece jump out of the teeth in time with the sound effects.

I also added screen effects as if it was being displayed on a computer/television screen. This includes the pixel lines and a fuzzy look, with random

movements as if the original recording was done quite badly with an amateur camera and recording. This, i hope, made the video look more realistic to hopefully make it more uncomfortable to watch.

Sunday 14th June


There were/are many problems with toonlines. Harrison originally created the toonlines for the scene but since then me and Daryl have put our own toonlines on all of the newer scenes we have created.

I decided to make all the toonlines 0.02 width as it was quite subtle but suited everything.

Friday 12 June 2009

I finished some more renders and lighting for Daryl’s newest scenes. I have copied it all to my usb so I can finish the rest off at home.

I spoke to Anja today and she expressed how she wants me to do some compositing on the weekend. I told her how I want to work on Daryl’s film the most as it is almost finished, then I can concentrate all my time to Anja. She said it wasn’t good enough as she needs a lot done for Monday as she needs to give it to her sound designer.

I agreed with her that I would work on Daryl’s project on Saturday and on hers Sunday. She will be sending me scenes to composite through on Sunday.

This week I have also redone the aniamtion of the plants in teh water of the fish scene in Anja's film. She told me she didn't like it and wanted me to redo it. She otld me to animate from the bottom of the stems of the plants and make it really subtle gentle movements until the fish are meant to swim away then they wll move more.


This is what I have done...


Notice I aniamted from the bottom of the stems at all times, and tried to keep it natural looking also.

Fat back can.. and gravy!

This week I created the Fat Back Bits in Gravy animation and composition. Daryl had previously done a test himself that I helped him UV map. I have now recreated it in much a similar fashion, although this time I put the can on a turntable and a funky coloured curtain behind it. I then added lights to the scene. Dan Dalli looked at the animation and noticed how you couldn’t read what was on the can because of my animation. I have now fixed the animation and hopefully it is final.

This is the original Animation i made which iI admit was rushed..

And this is the final version..


Thursday 11 June 2009

Dodgy ay of compositing, makes it harder for me to add effects such as lighting.

Sunday 31 May 2009

New Production Schedule


Sorry for not updating the production schedule recently. This shedule now has all the completed sections removed as there was a lot of it. (Hooray for completing tasks!)

It now shows everything we have to do starting next week till hand in. This also includes the remaining inking that Al and James did not complete.

As shown, myself and Daryl must try to complete the inking that Ali was meant to do by Monday and James is also giving his scenes a go for Monday too.

It is a shame that James did not contact us sooner, especially considering he was having difficulties using the programs (even with my tutorial). Although I am confident that he will have a lot done for Monday. I showed him, a second time, how to use the programs on Friday and he showed good progress by completing a few keyframes that day.

Good luck everyone. Remember the tutorial should still be up (look down this page for link) otherwise contact me and i'll send you the tutorial or help you out myself.

Friday 29 May 2009

Today Me and Daryl have finished inking in all the 2nd Year’s audience animations. It is also the day of hand-in for Ali and James for there inked in scenes. Unfortunately neither Alireiza or James have completed their scenes, nor have they started them. James did admit that he was having trouble with colouring and required me to show him again, how to do the inking/digitizing. Unfortunately, we didn’t hear from Aliereza at all. We tried going to his house one more time and caught him on the way back. He unfortunately denied to me and Daryl ever wanting to do the inking and assured us he never said he wanted to, even though it was his idea in the first place. It is a shame, if Alireiza had come to us sooner then we could have finished his scene ourselves. We still are, in fact, going to finish his scenes ourselves, although this time we will be doing it outside the deadline we set in place.

I have also finished modelling some stage lights and stage railings for the scene to add to the environment a little. Elisha's lights worked nicely with the doctor's room but looked out of place in the rest of the stage. So I've created some lights and railings and darted them all over the place. I made sure to put them behind the set, along with some curtains to maek it even obvious that this is a television set. In some shots the walls of teh tv set end and it is empty. This may maek it look like we made a mistake in production so to counter this I have built these purposefully to fill these areas so it is obvious that camera positions are intentional.

This week I have also redone the animation of the plants in the water of the fish scene in Anja's film. She told me she didn't like it and wanted me to redo it. She told me to animate from the bottom of the stems of the plants and make it really subtle gentle movements until the fish are meant to swim away then they wll move more.

This is what I have done...


Notice I animated from the bottom of the stems at all times, and tried to keep it natural looking also.

Fat Back Gravy Can Texture

Also today I finished the Fat Back Bits in Gravy can label which we will be using a close up of for the product placement shots.

I based the design loosely on the Heinz Baked Bean tin, but with my own style. Please note that the Pig’s face is done by Lewis taylor from 2nd year, it is one of his concept pieces of work and said it was fine for us to use.

Here is the texture.

Thursday 28 May 2009

Jame’s Email


James E-mailed me last night asking for a tutorial on Flash. I presume this means he hasn’t had much progress with his inking. I have created a tutorial for him and have sent it to him by E-mail. Good job I made the tutorial anyway :P

Argh!

Me and Daryl have tried calling, txt messaging and e-mailing Alierza to find out how his progress is going with the inking on flash.  After what happened before with his animation falling behind time we are worried he will not get it done.  I am willing to help him if he needs it but if he doesn’t get in contact with me then I don’t see how I can.

I even decided to go to his house to see if I could catch him there to see what was going on but unfortunately he wasn’t in.  Looks like me and Daryl should be prepared for the worst just in case.

Wednesday 27 May 2009

Tutorial up + even MORE cranes

http://www.woofiles.com/dl-192940-Uo7jHp2V-TutorialFlashInking.pdf

I created a tutorial for inking in Flash if anyone needs it. I tried to list everything from how to do it, and solving potential problems.

I have also redone Anja's crane placement yet again. She now wants even more cranes, enough to practically fill the screen and is now saying she wants pretty much all the cranes with 4 or 5 cranes on each string. This is annoying as it means all of my placement from before is almost worthless. Although as director, she is allowed to have these opinions of her work, it is still unfortunate for myself as I feel I have wasted time. Still at least this time it will be perfect.. at least I hope so.

To save time and so I didn't have to redo the entire animation, I have decided to keep teh cranes that are there and simply add to them with the new 4 or 5 sets of cranes. I will be deeting all the ones at the end near the window though as these will be more noticable to the audience. There are so many cranes in the rest of the scene that it will hardly be noticable, so I have just dotted a lot all around the rest of the scene.

Tuesday 26 May 2009


I sent an e-mail to Ali to see how his progress is going. We haven’t seen him in college since last Wednesday and we are a bit worried whether he is doing the work or not. We can’t get hold of him on the phone either.

Repositioned Cranes

Today I also redid Anja's crane room as requested. She said she didn't want ANY cranes in the centre, even though she agreed to it before she obviously doesn't like them there, which is fair enough.

She also wanted a LOT more cranes in apparently. So.. to do this I took all the cranes from the camera's path and repositioned them all. I then duplicated some of the referenced cranes from within the scene and duplicated them more. Anja also asked me to put a few cranes on the same string. This is very difficult with the files I have as I have already animated them. Still, i found cranes with similar animations and put them together so they looked like they were moving each other crane on the same string, to look more realistic.

She also wanted all the cranes around the table to be removed and have only a few around the sides.

Friday 22 May 2009

1000 Cranes for a hospital room

This week I was asked to place hundreds of cranes inside Anja’s hospital room scene. She had a reference for the crane that can be referenced inside the scene.

I didn’t want to continuously reference the same file hundreds of times as this would make it difficult to work with alter on when the reference editor would be filled with hundreds of links.

To make things easier for everyone I decided to have one reference file with hundreds of cranes in and to reference just that one file.

I also fixed the string they were hanging from as they were a ridiculously large poly size for something hardly noticable. I reduced it from around 60 polys to around 4. I kept it at 4 incase Anja wanted a little definition on it.

To make all the cranes I took the original and duplicated them six times. I them changed the size of these 6 cranes so they are all slightly different to each other.

I then animated all of the cranes individually so that 3 cranes (one small one medium and one large) would rotate slowly as if hanging freely from the ceiling, to the left and back and forth. I then rotated the remaining cranes to the right and back and forth. This meant I could, theoretically duplicate all of these and have different sized, different moving cranes. They were all the same speed though. So I then duplicated the entire lien of cranes twice. The first set i made move slower than the original and the second set I made move slightly quicker than original.

I now have a complete set of cranes all of different sizes moving at different speeds in different directions. Nice.

I then simply duplicated the cranes several times until I had my very own Crane Clone Army. This is now set up so I can begin moving in each crane into the scene. This is the start of moving in the cranes.

It took me days to do, but eventually I had all the cranes in the scene. Anja said I could put them everywhere in the scene. But obviously not in front of where the camera was moving. I asked whether I could put a few near the centre so the camera could dolly past a few cranes which I thought could look nice. She said it was fine and so this is what I created.

She didn't ask me to do this, but I thought I might be helpful and do some test renders and test compositing for this scene. I created about 10 seperate render layers inside the maya file and rendered out each individual layer. I then imported them into AfterFX to test what it could look like. She said the cranes would appear in the scene whilst the girl is making the cranse in the room and whilst the camera dollys through. I don't have the 2D animation but I thought I would geuss some timings in accordance with the camera dolly that Anja previously animated in the scene. Here is what I ended up with.

Wednesday 20 May 2009

20th May, Wednesday


Today i bumped into Alierza and told him how James was going to ink in his scenes, and the head deflation scene and if he could give us his 2D animations so that we could start inking them in on flash. He asked me and Daryl if he could give it a try so i let him know that I gave James till next week friday to get his scenes done so his scenes would have to be done by that date also. Even though that is three days less time than James has had he has agreed to do it for us anyway.

I have updated the Production Schedule again..


Newer production Schedule


Ok Elisha, now you have no excuse :P


Tuesday 19 May 2009

New and possibly only production schedule!!!


Here's the the production schedule for the rest of term. It's near the end people, so follow the schedule and we should be fine. :)

It will be updated when we have more information. You'll all be told/asked what you can do though so don't worry, no ones name will be put next to any task without them knowing :)

Wednesday 13 May 2009

Today I decided that Sam’s intro was great, but really wasn’t good enough for our film... simply because it looks to modern for our film.

In order to make sure I asked a few members of our group again whether changing it was worth it. Daryl wasn’t too bothered about Sam's design either way, he thought it looked good as it was but did agree with my comments. I asked Elisha also and she too thought that it wouldn’t fit with the style of our film.

I came up with an idea where we can still use most of the assets of Sam’s film so it wasn’t wasted time on Sam’s part but also fits in place with our film more. This was that the film could start off playing on an old 50s television set in black and white and a fuzzy screen. It would then zoom literally into the screen where it will then look straight through the ‘cameras’ of the broadcasting stage. Basically zooming back into our original animation.

This idea was helped from a previous group meeting we had with Kieron Dennis a while ago when showing him our storyboards/animatics of our progress with story ideas. He helped us brainstorm several ideas in several areas of the film, one being that the film could be entirely on an old television set. Although we didn’t catch on to the idea at the time it is obvious that it helped me come up with this idea for a new intro at this stage.

Daryl agreed that I could start working on the assets for this intro when I have time.

We knew that it is getting late to change things, especially considering the film isn’t near completion yet, but I still feel strongly that a different approach like this needs to be taken in order for our film to fit together well.

Thursday 7 May 2009

Thursday 7th May

Attempted a rough lighting test and composition test with 2D over 3D. Saw a potential problem of Daryl's animation being that RAM is bigger than the 3D set. He has started the animation already, outside of the scene and wants me to later composite this over the 3D background in After Effects. Reason being, that he didn't want to resize RAM and place him in the scene as it skrews up the toon shading on RAM. Doing it this way may not look as good as rendering from the set. For example lighting would be different and will have to be redone in After Effects. This of course means more work for me, but also wouldn't look as good as if it was already in the 3D scene with the scene's lighting. I suggested to Daryl that the best way in my opinion, is that RAM should be resized and to contact Moe (the creater of the model and toon shading) to see if he can adjust the toon shading afterwords so it doesn't skrew up. If this is possible then I see this as the best option as it means less work for me and no need to add extra grading as it won't be needed.

I have also showed James how to ink in so that he can start inking some scenes also.

I also asked Daryl to make a list of all the cameras he created in Maya and to create a chart with which scenes go to which camera. I could go through them myself, but it makes sense, and saves time if Daryl does this as he has already created them and he originally named the 2D scenes also.

Harrison worked out a good technique in order to reduce/eliminate cleanup issues with scans. I have asked him to relay the information to Daryl and have asked Daryl to use his technique in future scans. The reason that Daryl should use this technique is because he is already using Photoshop to batch scan his work and using Photoshop actions in order to reshape/resize the images in preparation for inkers such as myself to use. Whilst he does the scans it will be easy to implement this technique into actions alongside his other changes so that the files come out cleaned as well as cropped.

Friday 1 May 2009

Recently I have been working with Daryl in order to complete the inking of the 2nd Year’s 2D audience animations.  I have also worked for Anja this week in re positioning all the cranes within the scene.

Friday 1st May

I attempted to make the Fish Animation even slower at the beginning and quicker at stay in teh middle more as Anja suggested. Unfortunately I was having many problems with the fish randomly turning angles, even when adding new keyframes previously redone frames would change. I had no idea how to sort this out and have giving the animation all I can. I let Anja know how much trouble I was having with it and she said she would finish the rest.


This is the exact reason I only wished to do effects/compositiong/editing for Anja from the beginning as I told her I have never animated like this before before.

Considering this I am surprised I managed to work out motion paths as well as I did. I guess it would be better if someone rigged the fish to the motion path better than me, perhaps someone with more experience with them.

Continued Inking in Daryl's frames also.

Thursday 30 April 2009

Thursday 30th April

Broke apart every frame of professor's frames. Continued inking in Professor.

Used Grey as new background to look better.

Wednesday 29 April 2009

Wednesday 29th April

Started Inking In Mort as he is most in the foreground. This will give me a little sneak peek into what the full composition will look like.

Finished Inking in Mort

Placed Pink to make sure i am colouring properly. Used a colour that wouldn't be used.

EXPLAIN STUFF

Tuesday 28 April 2009

Tuesday 28th April

Showed Elisha how to ink in so that she can start inking some scenes.

Monday 27 April 2009

WEEK 2

Mon 27th April

Anja asked me to do up the fish animation again. With no exact key frames or exact timings it will be hard for me to get it true to Anja's vision. I will try as she suggested. If it isn't good enough and requires even more redoing then I will have to pass the job as I need to manage my time for other work, especially Daryl's inking.

I showed Harrison how to ink in so that he can start inking some scenes in.

Sunday 26 April 2009

Sunday 26th April

Continued Daryl's live tracing. Finished Live tracing, now need to finish repositioning and inking.

Saturday 25 April 2009

Saturday 25th april

Had software problems now sorted, continued daryl’s live tracing

Friday 24 April 2009

Friday 24th April


Finished animating newer fish sequence..

Anja explained to me to me that she wanted the fish to swim up to each other befroe waiting and ahev attempted to do this.

I hav also finished animating up some propellors for the bomb scene.


Thursday 23 April 2009

Thursday 23rd April

Showed Anja possible fisheye lens effect for shot that she wanted from after effects. Added some animation to fish at beginning. Anja wanted fish to slowly move towards each other then sway for a little bit before swimming away. She also wanted the fish to sway its fins on the spot. This is of course unrealistic for the actual behaviour of a fish but Anja wanted this regardless. As I have already used a motion path, it is possible for me to extend the motion path and adjust at either end of the curve, although this has proved quite difficult to do properly and requires quite a lot of care and precision in order to preserve the animation that is already their, but it is definately possible.


Other than this Me and Heba were not given any texturing to do, even though we were asked to meet up for this. Instead we only gave our input to her work and she wanted nothing else for us.

Back to Daryls project I guess..

Wednesday 22 April 2009

Wednesday 22nd April

Gave my input to Anja on her work. She wanted suggestions on her background of the bomb scene. I thought her paper design looked really nice although the inside of the bomber wasn't very clear. I suggested that she experiment merging both styles she has, keeping the origami paper look, but merging the texture of the inside of the bomber with it to have the best of both. In order to work well I suggested that it should be lightened though as it was quite dark. Though the inside of the bomber needs to be dark, i felt it needs to be lightened in order for shadows to be made clear from the above propellors, giving the origami feel to it. Of course paper textures will be needed but that is what me and Heba will be concentrating on tomorrow.

As I had previously found the inbuilt live tracing function in flash to not be very good me and Daryl went online to find out a tutorial on the best way to convert these images into flash from illustrator. .. this is what we found and have started to apply to our work.

Here is a comparison I found between Flash and Illustrators live trace functions, showing the difference in how you can use them.

http://www.http.com//edutechwiki.unige.ch/en/Flash_bitmap_tracing_tutorial

(Edited: that link appears to be down now but fortunately Daryl saved the webpage to his blog)

http://drtani303.blogspot.com/2009/04/tutorial-for-illustrator.html

This was definitely a nice tutorial to help us understand how the live tracing works but more experimentation is required in order to find the best use of this tool.

After looking into it myself I have found that the best way to use illustrators live trace for our 2D images is ‘One Color Logo’. This converts it to vector whilst keeping it slightly rough look which is nice evidence of it being hand drawn, but also makes it look slightly more straight and curvy as a vector image would look which is fine. Cleanup will inevitably be needed still in flash to remove random fragments of drawing around and inside the lines, but this is still the best function so far for producing a nice trade off between computerized and hand drawn imagery for the film.

After using this technique to convert the image to vector it can then be simply dragged into an open flash file and imported as a vector image in flash.

This window the comes up. I find it important to select these options as shown. Maintain layers by default is on, but i switch it off because otherwise it keeps whatever layers you have in illustrator and moves them into flash. Obviously we don’t have any layers in the illustrator file, although it will create a new separate layer with the new image if this is selected. So to stop a massive build up of separate layers i leave this off.

With this new file you then right click and select ‘break apart’. After doing this a few times it will be completely broken down to simple flash vector geometry.

The image can then be manipulated just like any other flash vector image, which means colouring it in is relatively simple. The only thing that isn’t simple is when gaps occur in the drawings. These need to be filled manually in flash before filling it with colour.

Tuesday 21 April 2009

Daryl showed us that Sam created a logo and title sequence for the professor. I wasn’t too sure whether it would fit into our film or not. No one else seems to mind and it is finished so it makes sense to leave it for now. We can always come back to it later if needed. Best to get moving on everything else at this stage.

Monday 20 April 2009

Term 3 – Week 1

Monday 20th April - In Anja's group it has been organised so that me and Heba will do a little texturing in the coming weeks. Mehmet expressed that he is happy to continue modelling but wished others to help with texturing. Me and Heba now just need the required files and help with direction in order to fulfill this.

Animated Fish for Anja. Used motion paths for the fish to make it easier. The reason for this was so that theoretically I could draw a line in maya for the exact route i want the fish to go. This helps as it means i can clearly see how the fish will move and will hopefully save time rather than moving the fish almost every frame and keyframing. This is also easier because it means I only have to keyframe main points of the animation. The main body of movement is calculated automatically when you set how many frames the line lasts for. But of course you can keyframe or change this yourself to make the fish stop on route for example. Using motion paths is also helps a lot for teh animated body parts. As the body movement sets itself up first, it

I also only animated the referenced fish so that... in theory... opening the scene maya file should automatically import the referenced fish WITH animation in each position so each fish will animate exactly the same in sync with each other. As shown this was NOT the case.

referenceFAILfish

Unfortunately there were many problems although it partially worked. The files were in fact replaced with the referenced animated fish although for some odd reason unknown to me, the position of the referenced objects were reset to the center of the screen. (oddly enough except one fish). In the picture above I have moved the fish away from the center so you can see that they all did in fact import with their animations, just in the wrong places. This meant I had to move and replace each fish back into their original (or close to) positions. I don't think the end result looks too bad and for my first proper maya animation attempt I am quite proud.

Sunday 19 April 2009

End of holidays

Over the Easter holidays I did use this time to relax, but also used this time wisely. Second week of holiday was reserved for me going on work experience to The Joint, a small Post Production company, which was great I might add. I then continued working on animating Anja’s paper cranes.

I started by creating a curve. I did this from the Top view in Maya so that the line will be created aligned in that view. Theoretically this should mean that when a model is attached to the curve as a motion path it will always move along the line aligned along with the Top View. Or in other words if a model is attached to it then the model should be standing upwards correctly.

I turns out this isn’t the case at all. Below shows some mages of my attempts to attach a model to the curve as a motion path.

In case it would skrew up the fish somehow I decided to test it on a separate model of an arrow created of equal size to the fish.

Arrow motion path 01

When attached to the curve it seemed to rotate 90 degrees. It was in fact facing the right direction though.

Arrow motion path 02

After a while of experimentation I worked out that these settings enabled the model to be properly connected to the motion path.

Arrow motion path 03

I then attempted to add the fish to the curve by selecting the fish’s main controller and adding it to the curve as a motion path. Unfortunately this error occurred. I wasn’t entirely sure what this meant so I tried deleting history to see if it made a difference.

fish motion path error

Low and behold it worked! The fish is now attached to the motion path. Although now it decided not to attach inline with the curve like the arrow did.

fish motion path after deletion of non deformer historyI borrowed a Rig from Moe from his film to test on a motion path and it attached correctly. I looked in the menu and it turns out ‘World Type’ should be set to ‘Object Rotation Up’

hyena motion path test WORKS

I then finally got the fish on the curve correctly. To test I recreated a curve that had been projected onto a bumped surface. As the picture shows the fish follows the motion path straight over the bump as it should.

Fish SOLVED

Unfortunately again, after getting it working and animating the body on the line the main scene file didn't import the new reference. So instead I imported it again and repositioned them.

ive done it WRONG.. i should change the reference

I also tried to texture the fish too as Anja asked me too. Here is an example of a UV of the fish’s fin and how i added the texture.

textureing_fin

It’s a bit tricky to do as bits such as this can often happen.

texturing_fin corections

This is the fin finished.

texturing_fin 2ND version

And the whole fish. I decided to texture it from a Japanese Yen note. I found an image on an old Yen note that would suit the period and place that our film is based from.

fish yen tex

click for better picture

And below is a playblast of the finished animation...